Building a Competitive Pokemon in Sword/Shield

Author: Matthew Hoover

Introduction

Pokémon, short for Pocket Monsters, is a video game franchise that has been around since 1996 when a company called Game Freak made the first games of the series: Pokémon Red and Pokémon Green. The games are about a kid, in a world of creatures known as Pokémon, catching Pokémon, battling other Pokémon with them, and training them, until he/she becomes the champion of the Kanto region. Over the course of the last 24 years, the company has introduced the world to many new familiar faces like Pikachu or Mewtwo, with almost 900 total Pokémon. With new games coming out nearly every year, the franchise has brought joy to people around the globe. Their latest entries, Pokémon Sword and Pokémon Shield, sold over 6 million copies on launch weekend alone, making it their highest-grossing Pokémon game (Watts).

Although Pokémon is a video game meant to entertain people, it is also a competitive esport. Hundreds of thousands of players make teams of Pokémon to battle with, and they challenge other trainers around the world to see who the better Pokémon trainer is. Battling involves a lot of strategy, luck, and skill, but it also involves raising Pokémon to be the best they can be by maximizing their stats in the most efficient way and having them use the best moves to defeat their opponents. In this article, I will be explaining the process of raising a Pokémon for competitive battling in Pokémon Sword and Pokémon Shield. But before I discuss the process, I will need to explain how stats work.

Each Pokémon has six base stats: HP, attack, defense, special attack, special defense, and speed. More information on each individual stat can be found here. Each stat has a maximum and minimum value depending on what level the Pokémon is (from 1-100), its effort values (EVs), its individual values (IVs), and its nature. EVs are values obtained when a Pokémon gains experience in battle by defeating a Pokémon or catching one in the wild. Each stat can have a maximum of 252 EVs, and the total number of EVs a Pokémon can have is 510. EVs will be discussed more later. IVs are set values for each stat (between 0 and 31) that a Pokémon is born with and cannot be changed. Each Pokémon is also born with a nature that cannot be changed. Each nature boosts a single stat by 10% and lowers another one by 10%. A list of natures and which stats they affect can be found here.

Required Materials

Getting the obvious out of the way, you will need a Nintendo Switch with a copy of Pokémon Sword or Pokémon Shield in order to raise your Pokémon. As for the in-game materials you will need, here is a list of the required items or other things you will have to obtain/do in order to follow these steps:

  • Complete the main story (defeat Champion Leon)
  • Judge feature in your Pokémon Box – defeat Leon in the Battle Tower
  • Wishing Pieces – can be bought from almost any merchant in the Wild Area
  • Pokéballs of your choice – can be bought in any Pokémon Center or from some merchants in the Wild Area
  • Everstone – hidden item southeast of Turffield Stadium
  • Destiny Knot – can be bought at the BP Shop in the Hammerlocke Pokémon Center for 10BP
  • Macho Brace/Power items – can be bought at the same BP Shop as the Destiny Knot for 10BP each
  • Technical Machines/Records of your choice
  • Held Item of your choice

Steps

I will follow along these steps myself and show examples of what I am doing along the way.

Step 1. Determine which Pokémon you want to use in battle.

A full list of Pokémon that can be obtained in the Galar region can be found here.

Figure 1: I have decided to build a Frosmoth (#350).

Step 2. Determine how you want to build that Pokémon.

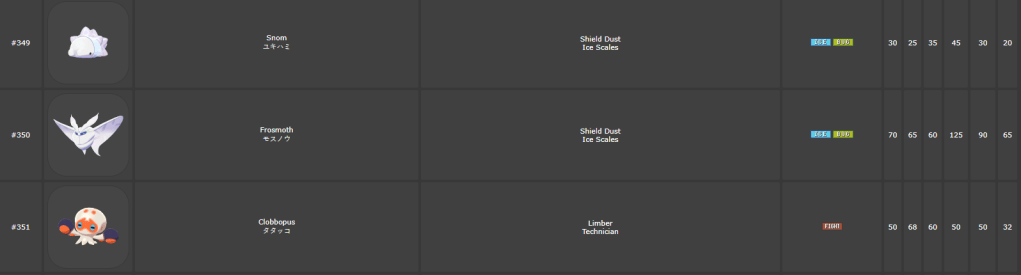
You will have to decide what nature it should have, its IVs, and what ability it should have. From the link in step 1, you can see the abilities and base stats of each Pokémon, and you can click on whichever Pokémon or ability you want to find more information about it.

Before deciding any of that, however, you will need to decide whether the Pokémon should be a physical or special attacker. Normally a Pokémon will utilize whichever attack stat is higher. Even so, you will want to look at which moves it can learn and determine if it would be better as a physical attacker or a special attacker.

Usually the nature of a Pokémon should increase one of its best stats and decrease either its attack or special attack. Some common natures are adamant, jolly, modest, and timid. The IVs will almost always need to be 31 in each stat, unless you are not using that stat at all (e.g. Pokémon utilizing its attack stat instead of special attack will not need 31 in its special attack stat). Another time you would want to have a lower stat is if you are utilizing the move Trick Room, which makes it so that the slower Pokémon in battle moves first for 5 turns. In that case, you would want to have 0 for the speed IV so that your Pokémon is more likely to be slower. The ability of a Pokémon is more of what your preference is. You will have to look at its options for abilities and decide which one would be best for your battle style.

Figure 2: Looking at Frosmoth’s base stats, I can determine that it will be a special attacker. I will give it modest nature with 31 in each IV except attack. From its abilities which are shown in Figure 1, I have decided that it should have the ability Ice Scales.

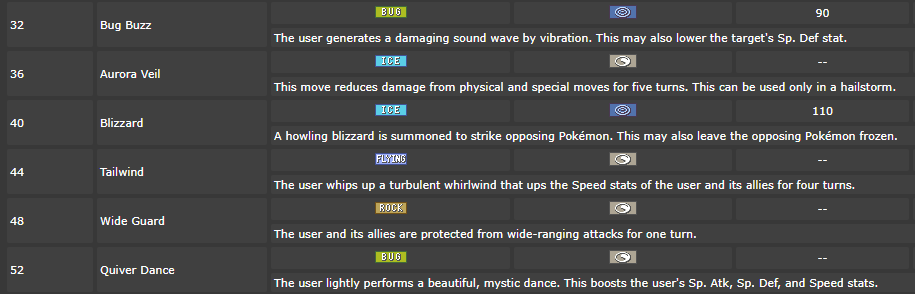
Step 3. Determine which moves the Pokémon will learn.

It is important to remember that a single Pokémon can only know up to four moves at a time. Clicking on the name of the Pokémon from the list linked in step 1 will give a lot more detailed information about the Pokémon, including which moves it can learn. Most of the time, the more useful moves are learned by the Pokémon leveling up or teaching it via Technical Machine (TM) or Technical Record (TR). If a move that it can learn is classified as an egg move, that means it can only be learned by its parent breeding with a different Pokémon that already knows that move. Step 5 will talk more about breeding.

Figure 3: Two of the moves I want Frosmoth to learn are Bug Buzz and Quiver Dance. These are level up moves. Another move I want it to learn is Giga Drain, which is learned by TM. The last move it will learn is Ice Beam, which is learned by TR. Since Frosmoth will not have any egg moves, this makes my job a little bit easier.

Step 4. Catch a parent Pokémon to breed for your competitive Pokémon.

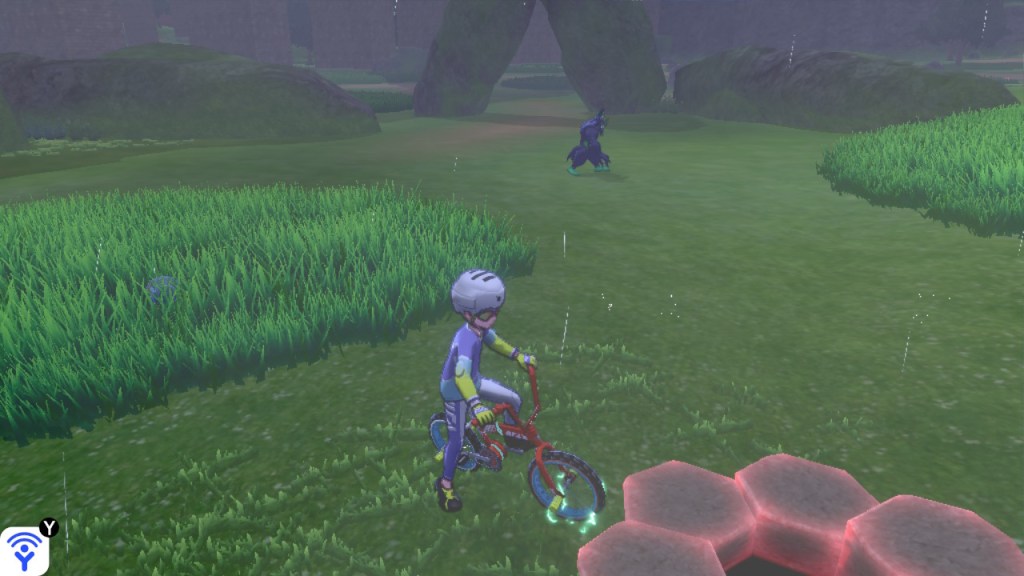
Please note that if a Pokémon has an evolution line (e.g. Charmander to Charmeleon to Charizard), any Pokémon in the evolution line can be used as the parent Pokémon. This rule does not apply to baby Pokémon, which cannot breed (e.g. Riolu, Cleffa, Munchlax). Also note that if you need to give the competitive Pokémon an egg move, you will need the parent to be female. This will be explained in step 5. It is easiest to catch a Pokémon from a high-leveled max raid battle. The Pokémon obtained from 5-star max raid battles will always have a few guaranteed IVs that are 31, so this will make it easier to give the children the best stats they will need. A list of all Pokémon available in max raid battles and the dens to find them in can be found here. You will have to click on the den numbers to find out which locations the dens can be found. If the ability you want on the Pokémon is its hidden ability, you will have to make sure you choose a den in which the Pokémon you are looking for is able to have its hidden ability there.

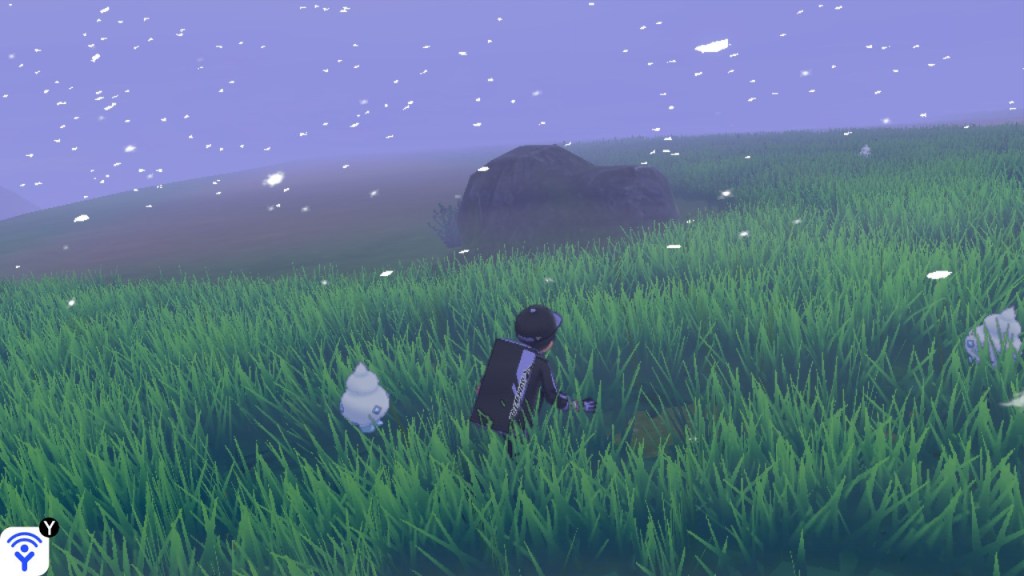
Once you know which den you will be looking in, you can search for the specific Pokémon you want by using the trick shown in this video from the linked time to 4:22. Once you find the Pokémon, battle it, catch it, and check if it has the ability you were looking for. If it does not have the right ability, repeat this step until you have the right one.

Figure 4a: Here it shows which dens I can find Frosmoth in. I could also catch a Snom to be the parent Pokémon since it evolves into Frosmoth and is not a baby Pokémon, but I will catch Frosmoth since it will be a 5-star max raid battle.
Figure 4b: This is the den I will be catching Frosmoth in.
Figure 4c: I caught the Frosmoth, but it has the wrong ability, so I will find another one.
Figure 4d: This Frosmoth has the ability I am looking for, so I will use this as the parent.

Step 5. Catch the other parent Pokémon.

If you need to pass down the egg move to the child, then the other parent will need to be a male of a different species of Pokémon that is in the same egg group as your first parent that can also learn the move you want your competitive Pokémon to learn. Every Pokémon has at least one egg group it is in. Pokémon in the same egg group as each other can breed together and produce a child. The child Pokémon will always be the same species as the female parent. For example, since Rhyhorn learns Dragon Rush as an egg move, if a male Charmander that knows Dragon Rush were to breed with a female Rhyhorn, then the child would be a Rhyhorn that knows Dragon Rush. A list of which egg groups Pokémon are in can be found here.

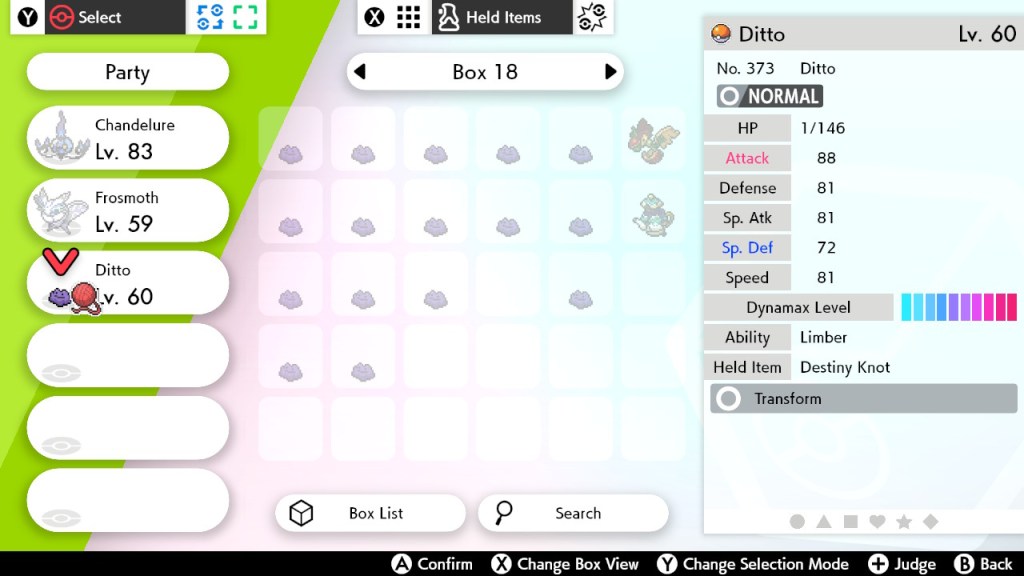
Next, you can either catch the opposite gender of the same Pokémon you caught in step 4, or you could catch a Ditto, which can breed with any Pokémon not in the undiscovered egg group. It is recommended to catch at least a few Ditto if you are going to breed Pokémon more than once. Having a few Ditto with different perfect IVs can make it easier to pass down the right stats when breeding. Either way, you might need a few different parent Pokémon anyways in case the children do not have the correct IVs. This will be discussed more in the next step.

Figure 5: I have a box of many Ditto that I have caught so I can pass down whichever stats I need to.

Step 6. Time to breed your Pokémon!

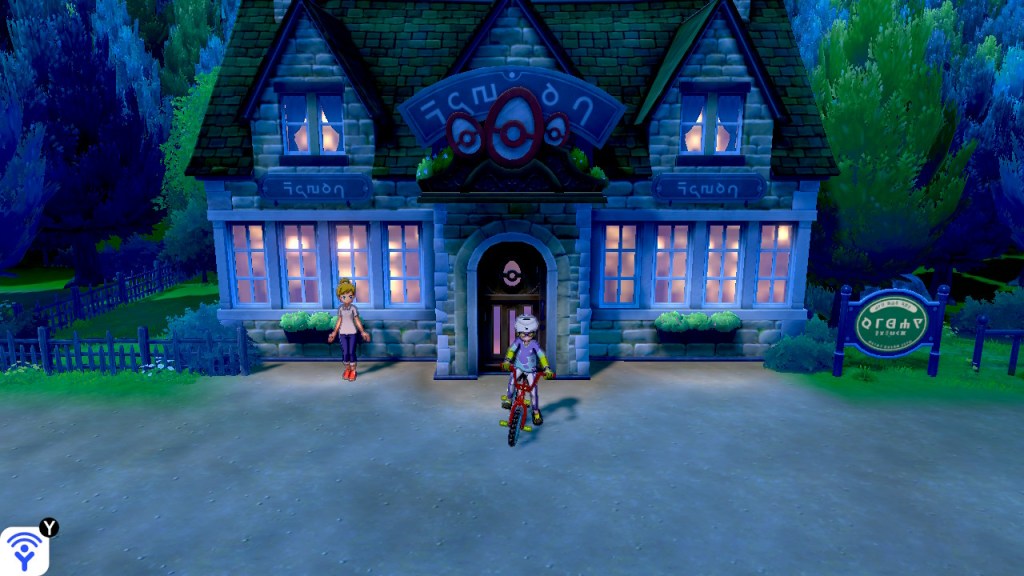
There is a nursery on Route 5, and there is another nursery in the Bridge Field in the middle of the Wild Area. Talk to the Day Care Lady outside, and she will ask if you want to leave your Pokémon there. You can only leave two Pokémon in one nursery at a time, so leave the two parents you got ready for this step.

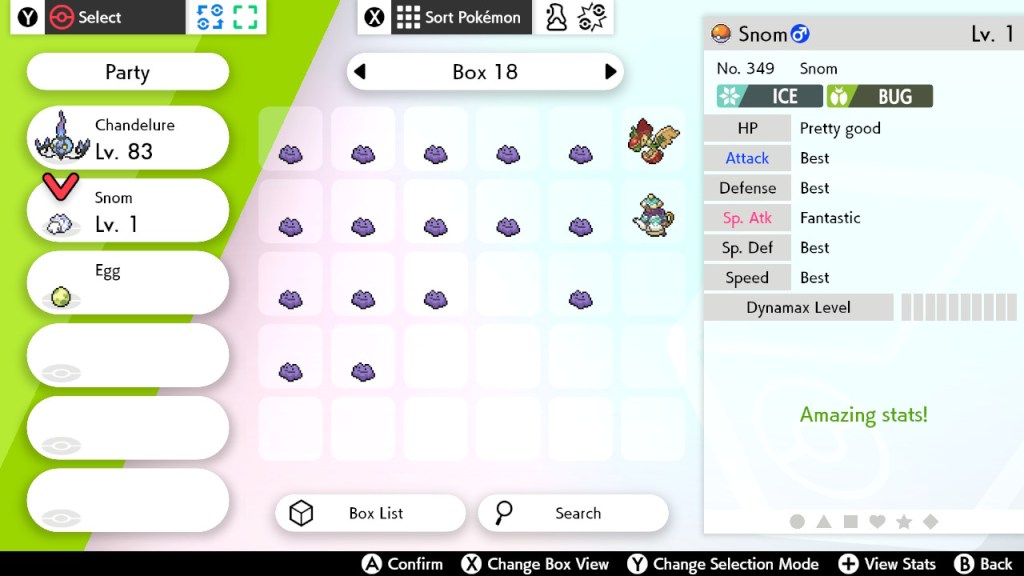
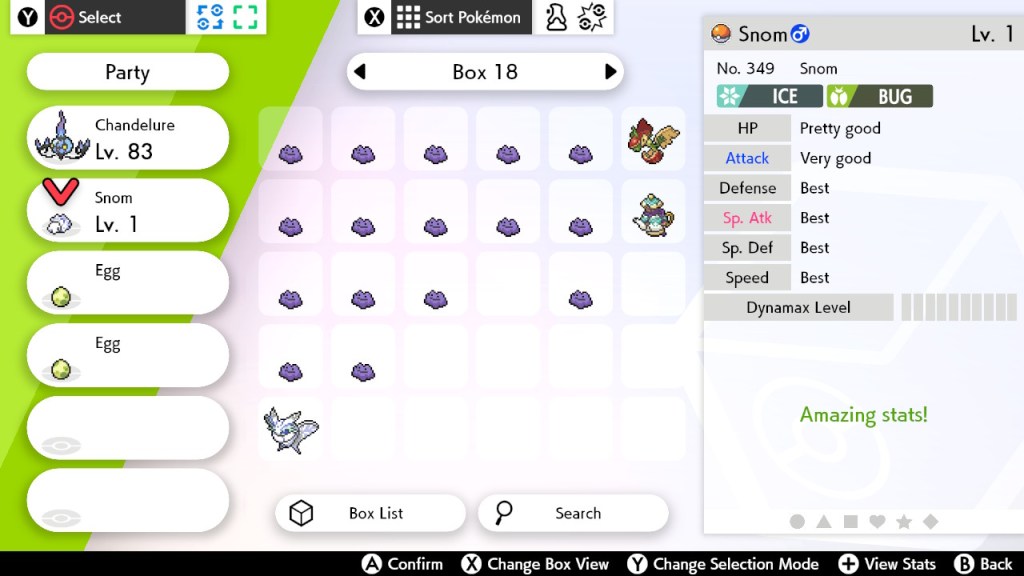
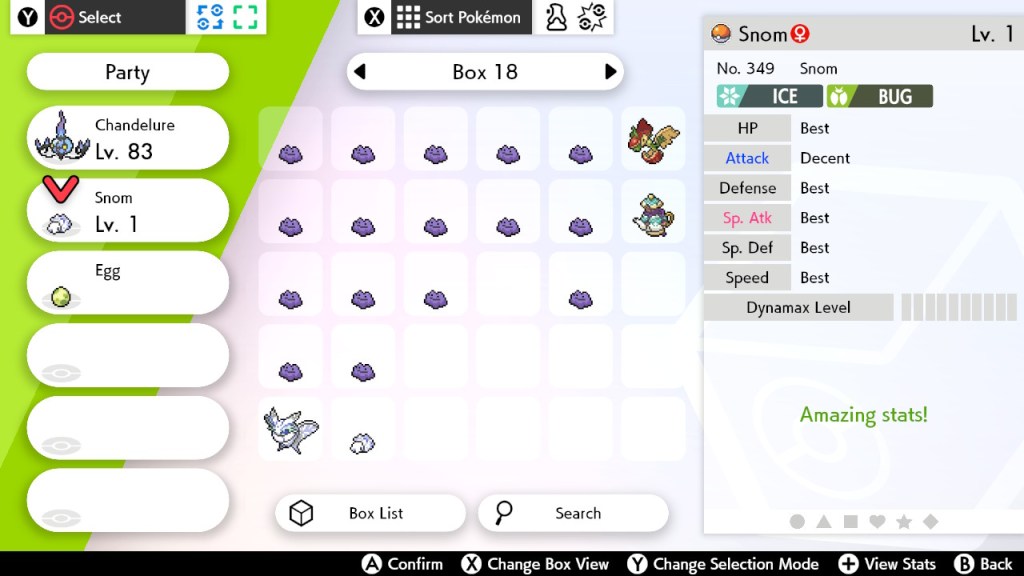
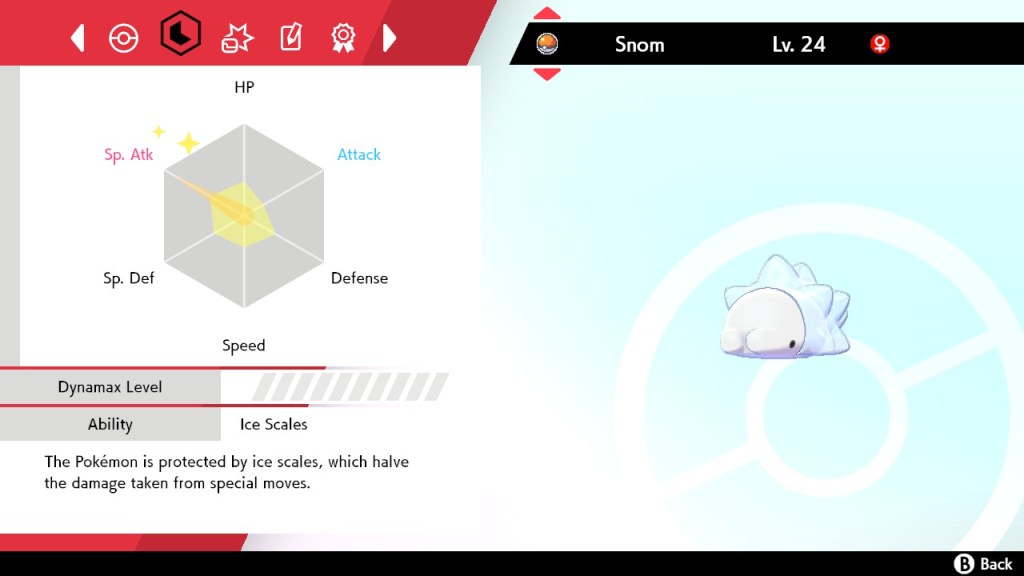
If one of the parents already has the desired nature, then have that parent hold an everstone. Holding an everstone will pass down the nature to the children. You can tell what nature a Pokémon is by looking at its summary. You can see which stats the nature enhances and diminishes by scrolling left or right to its stats. The enhanced stat will have pink text, and the diminished stat will have blue text. Have one parent hold a destiny knot. This will guarantee that the parents pass down five of their stats randomly to the child, with the sixth being entirely random.

For the Pokémon to breed, they will have to be kept in the nursery for a certain number of steps that you take in game. Depending on how compatible they are (which can be checked by talking to the Day Care Lady), they have a chance of producing an egg every 256 steps. A link to a page with the chances of producing an egg can be found here. After receiving the egg, you will have to take a certain number of steps to hatch it. This process can be sped up by having a Pokémon in your party with the ability Flame Body. This doubles the rate of hatching eggs in your party. The child Pokémon will hatch at level 1, and you can check if it has the correct egg moves, nature, ability, and IVs by looking at it in your Pokémon Box.

After passing down an egg move to a child, you may switch to using that child as one of the new parents so you do not need to use a different species of Pokémon anymore. As long as one of the parents know the desired egg move, it will always be passed down to the child. Breed the new parents together until you have the correct nature on one of the children and use that child as a new parent. Repeat this process, passing down IVs to the children and switching out the children with better stats for the parents, until you have the perfect IVs you are looking for. It is important to remember that the parents must have the correct ability that you want to be passed down. If it is a hidden ability, it can only be given to the child by being passed down from the child. If it is a normal ability, then the chances are much higher of passing down that ability than being a different one.
Once you have the correct moves, ability, nature, and IVs on a child, you can move onto EV training and leveling up your competitive Pokémon.

Figure 6a: This is the outside of the nursery on Route 5 that I will be using to breed my Frosmoth.
Figure 6b: This is the Ditto parent I will be using to pass down the desired IVs. This one is perfect in every stat except attack, which is exactly what I want on my Frosmoth.
Figure 6c: This is my Pokémon with Flame Body that I will use to hatch eggs faster.
Figure 6d: I got the nature I want on this child Snom, so I will use this as the new parent.
Figure 6e: This one has the correct nature like its parent, but it has better stats, so I will use it as the new parent to give the children a higher chance of being perfect.
Figure 6f: This child has the correct nature and IVs.
Figure 6g: Since this one has the correct ability too, this is the one I will train.

Step 7. EV train your Pokémon.

To recap, a Pokémon can have up to 252 effort values, or EVs, in one stat and up to 510 total. It is usually best to max out two of its best stats and put the rest in another. Every Pokémon has an EV yield, or an amount of EVs given to the Pokémon that gain experience from catching or defeating that Pokémon. A list of each Pokémon’s EV yield can be found here.

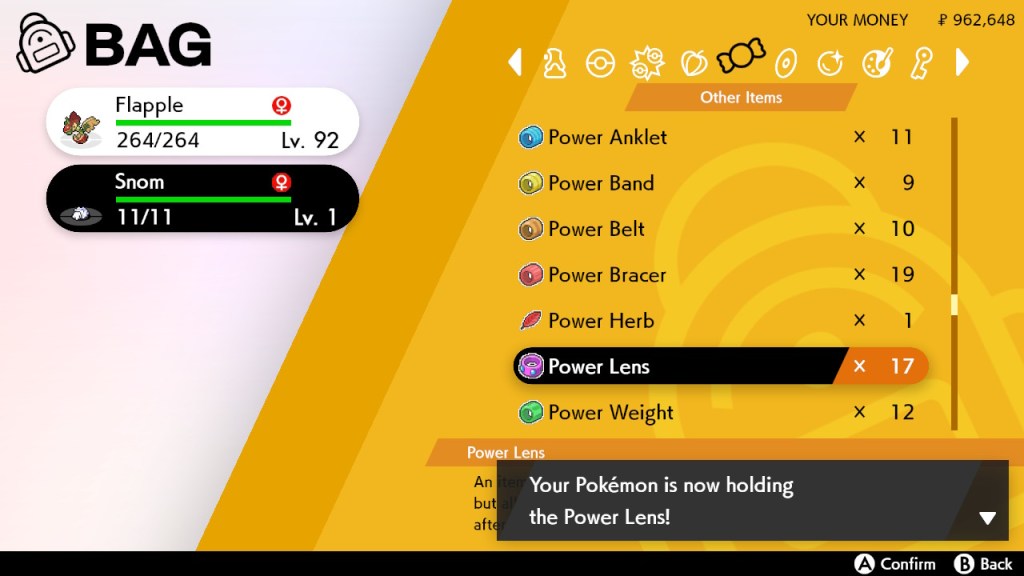
Once you have determined what your Pokémon’s EV spread will look like, you can then start battling wild Pokémon to EV train your Pokémon. Before EV training, remember to put EV training items on your Pokémon so that it will gain EVs faster. The Macho Brace will allow the Pokémon to gain EVs two times faster. The Power Anklet, Power Band, Power Belt, Power Bracer, Power Lens, and Power Weight will give eight EVs in whichever stat the item specifies for each Pokémon caught or defeated, no matter what EV yield the Pokémon has.

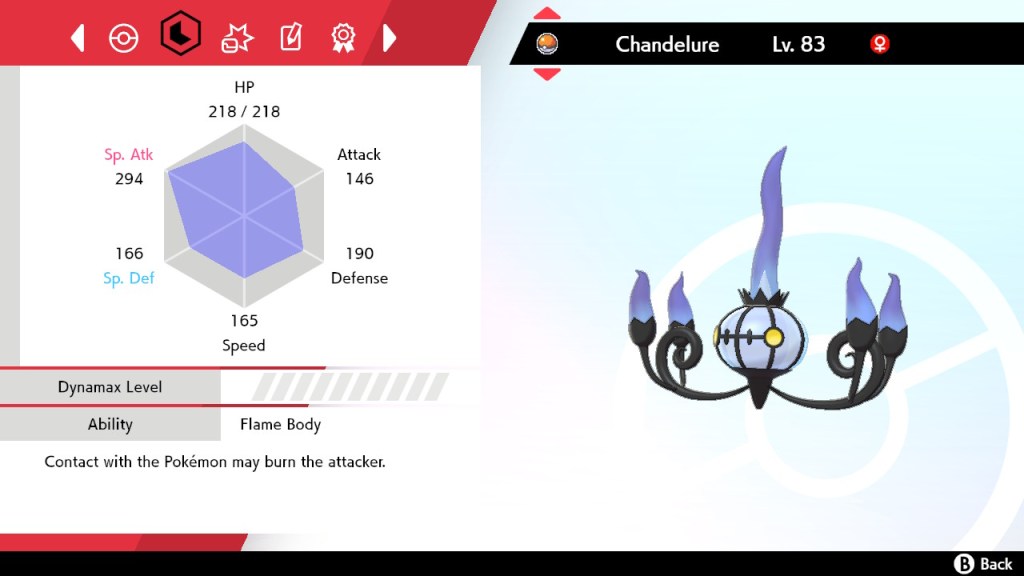
You can check your EV progress by checking your Pokémon’s summary, moving left or right until you get to the page that shows its stats in a hexagon shape, and pressing the X button. There will be an orange shape in the middle of the hexagon that indicates your progress in each stat. The closer a corner gets to a stat, the closer it is to being maxed out. You will know a stat is maximized when there are sparkles over the name of the stat.

Figure 7a: I am putting a Power Lens on Snom so it can gain Special Attack EVs faster.
Figure 7b: I will be defeating Vanillite until my Snom has 252 EVs in Special Attack.
Figure 7c: The sparkles indicate that its Special Attack stat is maxed out. I can move onto my next stat.
Figure 7d: I maxed out its Special Defense by defeating Duskull while Snom held a Power Band. I then put the Power Anklet on it and defeated one more Pokémon to put the rest of its EVs in Speed. It is now maxed out for its EVs and ready to finish.

Step 8. Evolve, level up, and teach it moves.

If your Pokémon does not evolve, then just level it up to whichever level you need it to. If it does evolve, then determine if any of its moves are exclusively learned by a prior evolution. If it has any of those, then teach it those moves first before evolving. If not, then evolve it and level it up to your desired level. You can see how a Pokémon evolves by looking at the same page as in steps 2 and 3. Many Pokémon evolve at a certain level, so they will likely evolve along the way when leveling up. Most of the time, you will just want it to get to level 50 since that is the level of competitive battling, although some Pokémon evolve after level 50 or learn moves at a higher level. Most moves are learned before level 50, or they are learned by TM or TR.

Figure 8: This is how my Frosmoth looks with its correct moves and leveled up to the maximum level.

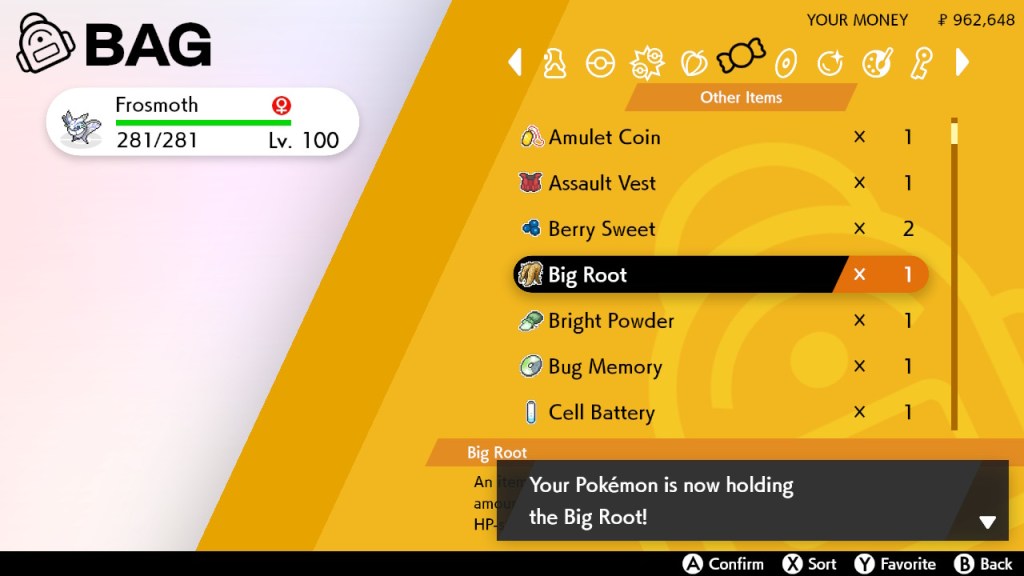
Step 9. Give it a held item.

Much like the moves and ability you give your Pokémon, the item it holds is solely dependent on what you want to give it. While I do not have recommendations for every single Pokémon, I can recommend that if you do not know what to put on it, berries are always useful, even if they can only be used once in a battle.
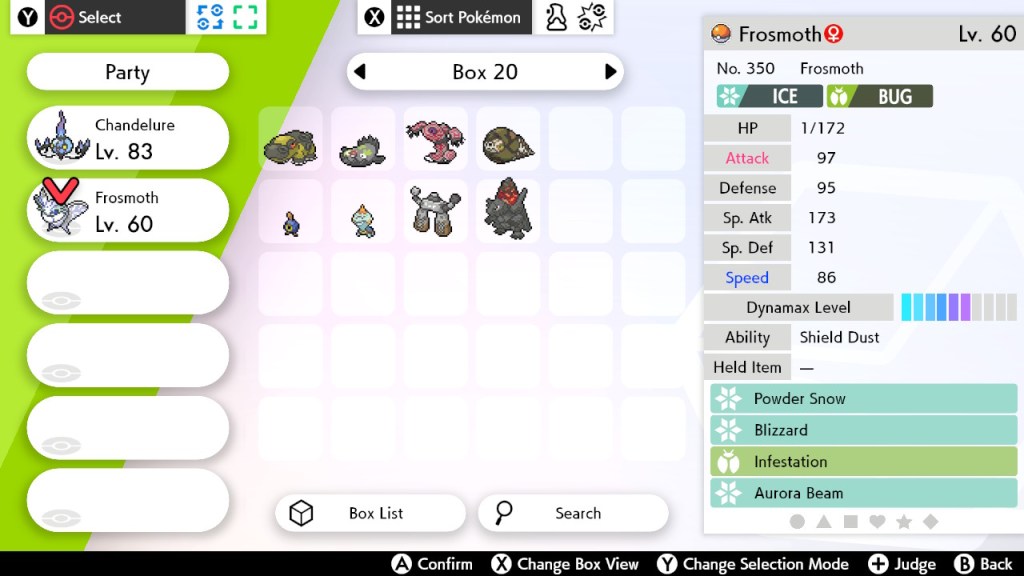
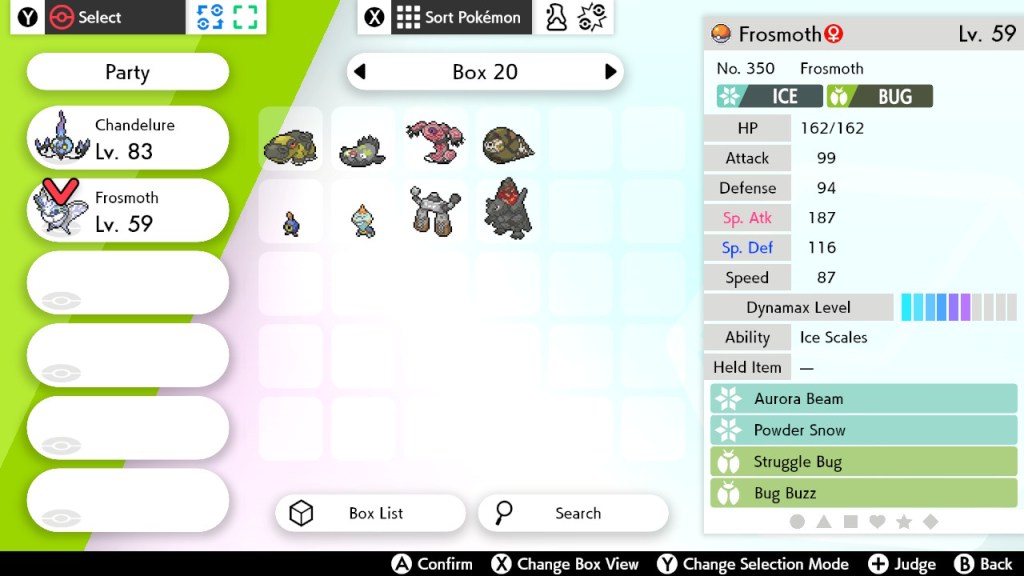
Figure 9: I decided to give my Frosmoth a Big Root so it can gain more health back when it uses Giga Drain.

Result

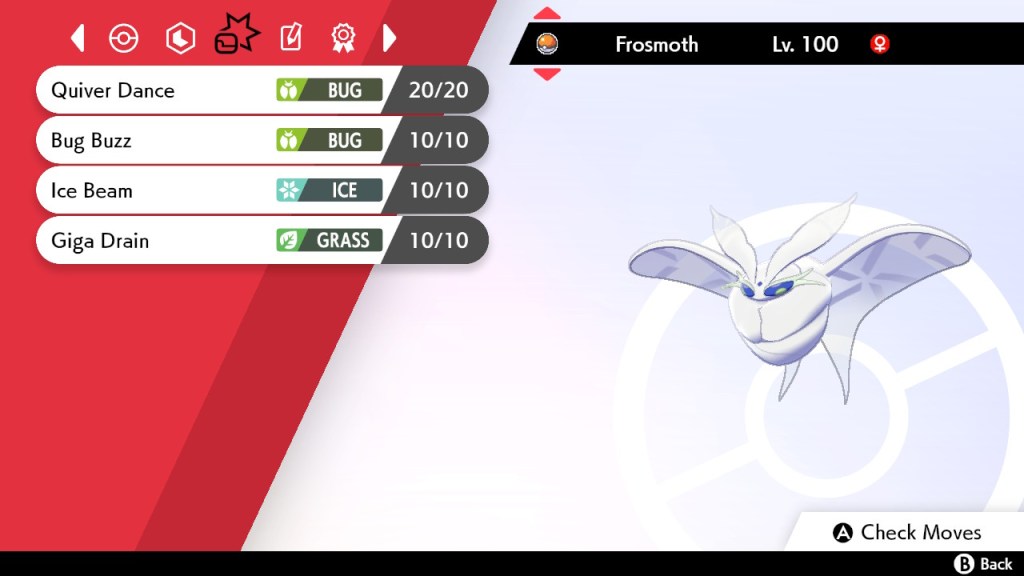
My Frosmoth is leveled up, trained with the correct effort values to maximize its best attributes, has a beneficial nature for its base stats, and has the moves I wanted it to learn so it can be a fierce opponent in battle. Now that Frosmoth is ready for battle, I can train up a few more Pokémon as well to make my team an unstoppable force.

References

Watts, Steve. “Pokemon Sword And Shield Had A Record-Breaking Opening Weekend.” GameSpot, Gamespot, 21 Nov. 2019, http://www.gamespot.com/articles/pokemon-sword-and-shield-had-a-record-breaking-ope/1100-6471623/.

How to Make a Video With IMovie

Posted by: Eli Lee

Nowadays more people are watching and creating more videos online either through Facebook, Youtube, Instagram, or TikTok. You might of even made a video yourself once whether it’s for class or just for fun. Making videos is a great way to be creative with your editing skills and entertain or educate your viewers on the content that you are providing them.

I will be going over how to make a quick and easy video using the program called IMovie. This program is only compatible for IOS or Macbook users only. I will first discuss about how to start your video and how to upload. Next I will then go over the types of edits that you can apply to your video and then lastly explain how to upload your video.

Getting Start

Step 1: When you first open the app or program it will show you this screen. If you had created videos using IMovie before they will also appear here.

Step 2: To create a new video you will click on the + symbol and it will open up the options “Movie” and “Trailer” for you. “Movie” is typically for longer videos while “Trailer” will limit the amount of video content that you can have but allow for different edit options.

Step 3: This displays your main editing page and one of the first things you will probably do is upload content. To do so you would click the down arrow to import an media that you might have

Step 4: Listed will be a variety of storage places that you have on your computer or have connect your computer too. Depending on where you saved your content you will locate it and tap on it to upload it onto your main edit page.

Step 5: Once your video has be uploaded into IMovie it will display in “My Media,” allowing you to drag and drop your content into the editing dash board below.

Editing Options

Color Balance: This allows you to balance the colors of your videos if you feel like certain colors are more brighter or darker than others.

Color Correction: This allows you to change the colors of your videos

Cropping: Cropping parts out of you video may sometimes be needed because sometimes you can have black side bars at the sides of your videos which can be removed.

Stabilization: Depending on how you are recording your footage can have a lot of movement to it making the video difficult to follow or view. This will allow you to stabilize your video making it more smoother and viewable.

Volume: Most of the time your video and background music will different audio to them. It is important to use this edit so that you can raise or lower your video audio so that it doesn’t over power the background music. Lowering it too much can also have flaws too.

Noise Reduction and Equalizer: Editing out or reducing the noises or those very scratch audio is important to get rid of as viewers might find it unpleasing to listen too.

Speed: If you tend to do a lot of time-lapse video or want to just speed a video up. This tool can increase your video play speed.

Clip Filter and Audio Effects: Add a default Filter provided from IMove and audio Effects.

Clip Information: Shows the duration of the video.

Additonal Features

Audio: Having the right audio with you content is always important. You wanna be able to match the correct audio

Titles: Adding words or subtitles can greatly improve your video because it can provide viewers additional content or understanding of your video if your audio is difficult to understand or not needed.

Backgrounds: Backgrounds are usually added as an introduction or ending of your content. It makes for a great way to start are video or to add breaks in between different clips.

Transitions: Having a good transition to the next clip helps with the flow and creativity of your videos. It’s a small feature but it can impact the quality of your videos.

Uploading and Downloading

Step 1: IMovie allows you several options on where you wanna upload your video.

Step 2: You will then name your video and then choose the resolution that your want.

Step 3: If you choose to download it, it will ask you where you wanna save it on your computer.

Congratulations! You now understand the basics on how to make a video on IMovie! Making videos can very time consuming and take a lot of work but at the end it is always worth it! Your video doesn’t always have to have a purpose, it can be completely random or just for fun. I hope that you can go out and make your own videos and with as much creativity as possible!

References:

https://www.apple.com/imovie/

https://www.kindpng.com/imgv/iombwJb_10-1-13-logo-imovie-png-transparent-png/

How to change your oil

Written by: Chue Tou Kha

Why would you want to change your oil?

Owning a car, maintenance is a responsibility because, without it, your car will compile problems from wear and usage. Changing your oil is an important part of maintenance because, with the absents of an oil change, the engine will develop many problems. From your engine being less efficient to permanently breaking. You would want to change your oil every 7,500 to 10,000 miles.

[Engine clogged with old oil]. (n.d). Retrieved from https://jalopnik.com/what-happens-if-you-dont-change-the-oil-in-your-audi-fo-1692660828

Why you would want to change you OWN oil?

Many people who aren’t familiar with working on cars would think that changing your oil is a complex task. But it is actually pretty simple with easy universal steps along with safety precaution. Also, it will require some tools but using them is simple. Tools and equipment could be pricey but investing in them, you could save more money doing it yourself than getting it done at a shop yearly. Another thing is that a shop tends to use cheaper filters and oil, so the full benefit isn’t there. While you can buy yourself quality oil filters and oil and it would be cheaper.

Getting started

Step 1: Purchase the correct oil and oil filter and have the right equipment

You can find the details regarding your oil in your owner’s manual or on the internet. It will give you the correct oil type, oil filter model, and how much oil your car can hold. You can also find the type of oil your car takes on the oil cap. Auto stores and Walmart also provide an information book that informs you of the correct part by giving you a specific part number.

Photos taken by Chue Tou Kha

Step 2: Have the right tools and equipment you need

For you to be able to perform this task, having the right tools and equipment is a necessity. American cars tend to be measured in Society of Automotive Engineers (SAE) while non-American are in metric (mm). There are sets of wrenches that provides you both measurements at Walmart and auto stores. Here is a list of things you need to get started:

  • Correct size wrench (SAE or mm)
  • Rubber mallet
  • Oil filter wrench/cap (fits oil filter size)
  • Oil drain pan(s) and funnel
  • Car creeper (Not necessary)
  • Paper towel
  • Plastic gloves
  • Equipment that can lift your car up (any of these will work)
    • Floor jack with two jack stands and two wheel chocks
    • 2 Ramp with two wheel chocks
    • Portable car lifter

Photos taken by Chue Tou Kha

Step 3: Lifting your car

To perform an oil change on your car you must lift your car. A leveled surface is recommended for a more accurate and easy experience. Otherwise, a sloped surface requires estimating the oil level on the dipstick and oil drain placement for the draining of the oil

Photo taken by Chue Tou Kha

  • Floor jack method: First place the wheel chocks on the two rear wheels. Then before starting to jack the car, the location of where you are jacking is important. Look for the indents underneath both sides of the car. Place the jack underneath it and jack it to a height where you can place your jack stand underneath the frame but also, be able to work underneath the car. Do the same to the other side of the car. Jack stands should be placed under the metal frame for it is strong enough to support holding your car up. A safety precaution is to leave the floor jack, jacked underneath the indented bar to catch the car if it falls.

Photos 1 and 2 taken by Chue Tou Kha

  • Ramp method: Push the ramps into the front of your wheels of the car and make sure it is aligned with your wheels. If it is not aligned, you could drive off the ramp when driving onto them. After making sure you align them, drive up the ramp slowly and stop when you hit the guard of the ramps. Put your e-brake on and then wheel chocks behind your rear wheels.
ChrisFix. 2015. [How to change your oil]. Retrieved from https://www.youtube.com/watch?v=O1hF25Cowv8
  • Car lifter method: Similar to jacking your car up, place the lifts underneath the bar that has the indents. Making sure it is even on both sides, proceed to lift the car up to the desired and workable height.

Photos taken by Chue Tou Kha

Step 4: Performing the oil change

Either using a car creeper or a cardboard box to lay on, going underneath you must locate the oil pan and the oil filter. Looking underneath with many other parts, it may be confusing on which is the oil pan. To tell which part is the oil pan, look for a bolt (oil drain plug) that sticks out. An oil filter has a cylinder shape and usually near the oil pan. Note that some oil filters are located in the engine bay and not underneath.

Photo taken by Chue Tou Kha

The oil pan needs to be empty first. Grab an oil drain pan and place it under it and note that oil will flow out so directly underneath it isn’t a good placement. Find the right wrench that fits perfectly, then use a mallet and use carefully pound it to loosen it. After that, use the wrench to continue to loosen the bolt. When it is completely loosened, the oil will flow out immediately so have your oil drain ready. After it completely drains, tight the bolt back in and don’t over tight it.

Photos taken by Chue Tou Kha

The next step is to take off the oil filter and again, place the oil drain pan underneath it. Using an oil filter wrench, place your wrench around it and twist it to the direction that loosens it. If using a cap, make sure it fits and use a ratchet with an extension to reach the filter and loosen it. Again oil will immediately drain so it is important to have your drain pan ready.

Photos taken by Chue Tou Kha

After removing the old oil filter, have your new one ready. However, before screwing it onto the car, lubricate the threads and the rubber on the filter with your new engine oil. After doing so, screw the new filter onto the car with an oil filter wrench or cap.

Photos taken by Chue Tou Kha

After replacing the oil filter, you are finished with working under the car. You can now lower the car all the way down. The next step is to put your new engine oil into the engine. Open the hood and prop it with the hood rod. Then open the engine oil cap and place the funnel into it. Pour according to how much your car can hold and always look at the marks on the side of the oil container. The marks represent the number of quarts in the container. Be careful to not overfill your because it can flood the engine, thus breaking it. You can check it with the oil dipstick, where “L” is low and “F” is full. If you overfill a little, you should be fine. However, if it is a lot, you must drain it and repour the right amount. When screwing the cap back on, don’t over tight it.

Photos taken by Chue Tou Kha

Step 5: Cleaning up and recycle old engine oil

After putting in the right amount of oil into your car, you just finished changing your own oil. Now you must get rid of your old engine oil and to do so, pour the old oil into an empty container. After pouring the old oil into an empty container, you must not throw it away in your garbage can. Instead, take it to a local auto store that offers the service of recycling it for free.

Photos taken by Chue Tou Kha

Concluding

Now with these simple steps, instead of taking your car to a shop. You can save a lot of money by learning how to change your own oil. Not only are you just saving money and providing regular maintenance on your car. You are also giving the best to your car, unlike a shop and also developing a useful skill.

Reference

How to Change Your Oil. (2015). Retrieved from https://www.youtube.com/watch?v=O1hF25Cowv8

Virus-Free Easter

During the lockdown, it may be hard for many of you to be able to survive during the lockdown. Now you’re probably not dying, but I’d be willing to bet that you’re dying of boredom. The lockdown has forced everyone into their homes without much notice, and doesn’t allow us to meet in groups of more than 5. To add to that, we don’t have March Madness, the NBA Finals, or much else to watch on TV, so what do we do? At this point, your family has probably cancelled whatever Easter gathering you had in mind… However, I’m here to inform you about a way that could allow you to still see your family on Easter. The goal of my project here is to help anyone that reads this by showing them precautions they can take to have a fun and safe Easter dinner without any risk. Of course it will be a bit out of the ordinary, and will be a tad bit odd, if being with your family on Easter is important, you might want to try my plan.

You’ll need:

Food (This all depends on what you and your family prefer)

Plastic Forks

Plastic Knives 

Plastic Spoons

Surgical/Disposable Masks

Disposable Gloves

Chairs (Enough for whomever may be coming)

An Available/Open Area Outside

Garbage Bags

The first step should obviously be introducing this idea to your family. I would recommend asking through a text, a call, or over social media. Get in touch with a few of your relatives and let them know that you’d like to have an Easter gathering. Schedule the gathering preferably 14 days after you decide to ask your family in order to allow for your safety and for time to throw everything together. During this time, make sure to tell your family or others that in order to attend, they must practice social distancing during those 14 days. After explaining these steps to them, they will hopefully be up for attending, but some people will most likely steer clear of the idea. If they do, there’s no way to force them to come obviously, but reassuring them that they are/will be safe is a good idea, and will most likely persuade them to come. While persuading them, use facts that I will discuss later on as your reasoning. If you follow these steps exactly, your Easter dinner will be completely safe!

The second step is to make sure none of the invited guests are sick yet, and to eliminate the possibility of anyone else getting sick. The COVID-19 Virus is said to show up in someone after 2-14 days, “with a median of 5 days” according to “hopkinsmedicine.org.” I can verify this, as every person that I’ve seen with the virus has said they’d started feeling sick after 4-7 days. Ask any of your guests beforehand if they’ve experienced any early symptoms such as coughing, sore throat, or if they’ve felt alright in general. If they have felt alright, they should be okay, as long as you take extra precautions while you’re all together. These precautions include avoiding coughing, sneezing, touching or any other bodily functions that could allow for the spread of germs. So as basically, as Edna Mode in the “Incredibles” said: “No touching!” If anyone asks you why you’re taking these precautions, inform them of the 2-14 day timeframe that the coronavirus takes to show symptoms, and inform them that they can get sick from other people’s bodily fluids (which is how the virus is passed on). According to the CDC, “The virus is thought to spread mainly between people who are in close contact with one another (within about 6 feet) through respiratory droplets produced when an infected person coughs or sneezes. It also may be possible that a person can get COVID-19 by touching a surface or object that has the virus on it and then touching their own mouth, nose, or possibly their eyes.” 

For your third step, have someone (if not yourself), who’s practiced social distancing for over 14 days get supplies and food from places like Walmart or any local stores that offer pickup for things. Order any kind of food you’d like to have at your gathering, along with plastic silverware, surgical gloves, and face masks. The food items should be kept sort of simple, with maybe a Ham, some potatoes, corn, and maybe a casserole or something, as those require a small amount of ingredients compared to a huge easter feast. During a pandemic, you should settle for whatever is doable. After pickup, these items should all be wiped down using some sort of disinfectant wipes or cleaning supplies, as the virus can live on these surfaces. It would be best that one person prepares the food as well, in order to prevent several people making several smaller dishes. Use surgical gloves and a mask if you’re cooking on your own; however, If you’re not cooking the food yourself, ask the person cooking the food to use the same things when cooking.  This reduces the risk of the spread of any possible germs. If you do not wish to cook or buy ingredients, you should discuss what needs to be done with people who will, and explain to them the precautions they must take to keep everyone safe.

The fourth step is to set up and execute the meal. Make sure to have your meal outside, and either purchase, borrow, or set up some chairs to sit on. Being outside reduces the spread of any kind of germs, and allows for you to be a good distance from your family, while still being able to get together. Set chairs 6 feet apart and tell everyone to grab a facemask when they arrive, and have the meal pre-portioned on paper plates. Have extras available if people would like seconds. Provide everyone with plastic silverware, and keep any on hand in case someone needs extras. When finished, make sure to provide a garbage bag or two for everyone to throw their masks and trash. During the entire time, even if someone has coronavirus (which is very unlikely if they’re there), the odds of you or anyone else contracting it are extremely slim. 

Cited Sources:

Maragakis, L. L. (n.d.). I’ve been diagnosed with the new coronavirus disease, COVID-19. What should I expect? Retrieved April 10, 2020, from https://www.hopkinsmedicine.org/health/conditions-and-diseases/coronavirus/diagnosed-with-covid-19-what-to-expect

“What You Need To Know About Corona Virus (COVID-19).” Https://Www.cdc.gov/Coronavirus/2019-Ncov, http://www.cdc.gov/coronavirus/2019-ncov/downloads/2019-ncov-factsheet.pdf.

David, and Masumoto. “There’s Risk in Talking Politics over Dinner, but the Rewards Might Be Worth It.” Fresnobee, The Fresno Bee, 27 Dec. 2019, http://www.fresnobee.com/opinion/opn-columns-blogs/david-mas-masumoto/article238702608.html.

Saltzman, M. (2019, September 23). How to Video Chat Using FaceTime on Your Apple Device. Retrieved May 3, 2020, from https://www.aarp.org/home-family/personal-technology/info-2019/how-to-facetime.html

Álvarez, J. A., & County of San Diego Communications Office. (2020, March 14). Social Distancing, Visiting Restrictions Established; Mass Gatherings Banned; 5 More Positive COVID-19 Cases Reported Locally. Retrieved May 3, 2020, from https://www.countynewscenter.com/social-distancing-visiting-restrictions-established-mass-gatherings-banned-5-more-positive-covid-19-cases-reported-locally/

How to make your own Kimchi

Photo courtesy of Manngchi.com
https://www.maangchi.com/recipe/tongbaechu-kimchi

Kimchi is a staple of Korean cuisine made of salted and fermented vegetables and is one of the most important banchan (side dish) and can be found at every Korean meal. My father discovered his love for this dish while he was stationed in South Korea in the 1980s, and as he made it at home over the years, I found a love for it myself. There are hundreds of different varieties of kimchi, all with different preparations, ingredients, and flavors. Even among a single variety of kimchi families will have their own method of preparing it. The Korean word kimchi translates to fermented vegetable, though not all varieties are fermented and can be eaten fresh. In this article I will explain to you how to make the Baechu variety, a spicy and fermented Napa cabbage kimchi.

Ingredients and supplies

For this recipe you will need:

  • 1 large Napa cabbage
  • 1 Korean radish
  • 8 garlic cloves
  • ¾ cups Korean chili flakes
  • 4 Green onions
  • 1 Medium sized carrot
  • Salt
  • Rice flour
  • Sugar
  • Fish sauce

The basic ingredients for Baechu-kimchi are Napa cabbage, Korean radish, green onions, carrots, garlic, salt (kosher or iodized will work), fish sauce, sweet rice flour, sugar, and dried and ground chilies. If all these ingredients are not available, then a premade kimchi sauce can be found at any Asian food market. This recipe will show you how to make your own kimchi sauce. For preparation, you will need the largest bowl you have, a small pot, a mixing bowl, a cutting board, a large knife, and a large mouth 2qt mason jar with a lid. If a 2qt jar is not available, then two 1qt jars will do. A large Napa cabbage, about two pounds, will make about two quarts of kimchi.

Preparation

The first step to preparing kimchi is to cut and salt the cabbage. Start by taking two pounds of cabbage and quartering it longways. Trim off the hard stem and cut the cabbage into 1-2” long pieces. The leaves could be left long if you desire but cutting them into bite sized pieces makes it easier to eat, and helps it ferment faster. After cutting the cabbage, rinse it off with water and place it in your large bowl and salt it with about ¼ cup of salt, tossing it to ensure it is evenly salted. Let the now salted cabbage sit for 2 hours, turning it over every 30 minutes. This both seasons the cabbage and causes it to give up its water, making it soft and easier to pack into jars. After those 2 hours, rinse the cabbage under cold water to remove any remaining external salt.

Additionally, because this is a fermented dish, salting the cabbage will kill off any dangerous bacteria that could cause your batch to go bad. With the bad bacteria gone, this creates an environment for the lactic acid bacteria (necessary for fermentation) to thrive.

While waiting the 2 hours for the cabbage to absorb the salt, you can prepare the porridge to make the sauce. Start by boiling 1 cup of water in your small pot with 1 tablespoon of sweet rice flour. Boil for 5-10 minutes until it starts to bubble. And 1 tablespoon of sugar and boil for another minute until the sugar dissolved and the mixture is slightly translucent. Remove from heat and let it cool completely.

To make the kimchi sauce, pour the now cooled porridge into your mixing bowl. Add 6-8 minced garlic cloves, ½ to ¾ cups Korean hot pepper flakes (gochugaru), and 4 tablespoons of fish sauce. The fish sauce can be found at every Asian food market and is one of the most important ingredients. It gives a fishy, savory, and ever so slightly pungent flavor to the kimchi. However, if you’re a vegan, or just don’t like this kind of fishy flavor, then about 2-3 tablespoons of soy sauce will be a good substitute. If you are a fan of this kind of falvor and want even more, adding 2 tablespoons of fermented salted shrimp (saeujeot) to your kimchi sauce will provide you with a greater fishy/umami flavor profile.

Now that the sauce has been made, add to the bowl 4 chopped green onions, 1 cup Korean radish matchsticks, and ½ cup carrot matchsticks. If you have finished salting and rinsing the cabbage, pour the sauce over the cabbage and toss it over repeatedly until every piece is coated and all of the chopped vegetables are evenly distributed.

The kimchi can now be packed into your jars. The jars must first be thoroughly washed in hot water. After the jars are filled, they must be covered with a lid, but be sure to screw the lid on loosely. As the kimchi begins to ferment it will give off carbon dioxide as the bacteria begin to propagate and do their work. If this gas cannot escape, then the pressure may cause the jars to crack or explode.

To begin the fermentation process, place the loosely covered jars on your counter or table, out of the sun, and let them sit at room temperature for 2 days. After about 12 hours you will notice bubbles coming up from inside the jar. This means that the bacteria are doing their job. Once a day you should tighten the lid, shake the jar to ensure every piece is still covered, then break the seal again. After those 2 days, the kimchi will be ready and you may put the jars in your refrigerator to halt the fermentation process and preserve it for up to 4 weeks.

Consumption

Kimchi is one of the most versatile side dishes in the world. This variety can be eaten fresh or fermented. If eaten fresh, it will be sweeter and firm. If fermented it will be more sour, spicier, and crunchy. When fermented it can be eaten on its own, over rice, or with grilled or barbequed meats. It can even be added to ramen to give a spicy and tangy flavor to what would otherwise be a boring bowl of noodles. Any dish that you can imagine that you feel would pair great with a spicy and savory side dish would go great with kimchi, and after learning how to make it, if you come to love it as much as I do, you will never run out.

Works Cited

Manngchi. “Napa cabbage kimchi.” Manngchi, June 22nd, 2014. https://www.maangchi.com/recipe/tongbaechu-kimchi

How to Make 떡 (Tteok/Korean Rice Cake)

Photo Courtesy of Korean Bapsang
https://www.koreanbapsang.com/tteok-sanjeok-skewered-rice-cake-beef-vegetables/

On New Year’s Eve my friends and I wanted to try something new for the new year. I heard about Korean BBQ from a friend, and saw there was a Korean BBQ restaurant in Minneapolis. We tried it out and it was absolutely amazing! One of my favorite foods we ate their was Tteok, Korean rice cake. I decided to learn how to make, and now I am going to share this food with you.

Origin

Tteok is with a “t” or “d” sound and then “ukk” at the end. Tteok may sound like duck but it is the opposite to that. It is a gelatinous rice cake originating from Korea. It only takes glutinous rice flour, water, and steam to make tteok.

Recipes Tteok Is Used In

Tteok can be used in many recipes. The most popular dish tteok is in is tteokbokki. Tteokbokki is spicy Korean rice cakes. You take the tteok, a spicy sauce, vegetables, a hard boiled egg, fish cakes, and mix it together. Tteok is also used for texture in recipes. I personally like to put it in ramen and bulgogi (strips of marinated beef).

How To Make Tteok

This is recipe is a kind of rice cake called garaetteok and by Maangchi.

Ingredients

  • Glutinous Rice Flour (2 cups)
  • Salt (1/2 teaspoon)
  • ¾ of boiling water if using microwave (1 cup if using a steamer)
  • Sesame Oil (1 teaspoon)

Instructions

This recipe is for if you’re using a microwave. If you don’t want to use a microwave there is a recipe on Maangchi’s website which is in the works cited.

  1. Mix rice flour, salt, and boiling water together in a bowl until fully incorporated.
  2. Cover the bowl with clear plastic wrap but leave a gap for the steam to escape.
  3. Microwave the dough for 2 minutes then mix and microwave for 2 more minutes.
  4. Now put a ½ teaspoon of sesame oil on a cutting board. Put the dough on the cutting board and pound with a pestle for about 5 minutes until smooth and stretchy.
  5. Cut the rice cake in what when portion size you like (stick, nobs, etc.)
  6. Finally take a ½ teaspoon of sesame oil and rub a thin layer on the rice cake to give some flavor and to keep them from sticking together.

In times like today we can become bored very easily. It is always good to learn something new. I hope you enjoyed this adventure of learning how to make tteok.

Works Cited

Maangchi. “Garaetteok (Cylinder-Shaped Rice Cakes for Tteokguk or Tteokbokki).” Maangchi, 17 Jan. 2013, http://www.maangchi.com/recipe/garaetteok.

Author: August Galeazzi

Editor: Spencer Marlier

How to Pheasant Hunt

Me and my friend hunter in South Dakota

Pheasant hunting can be a very exhilarating way to get outdoors. It can also be a great way to provide your family with food on the table. With the right location, gear, a little know how, and some patience you will have some roosters in your vest in no time. If you are a first-time pheasant hunter, here are the initial steps to get into the field and on some birds.

What is a Pheasant?

A ring-necked pheasant is a non-migratory bird that was brought to the U.S. in the 1880s from Asia. They can be found in throughout the northern United States and Canada. The male pheasant is called a Rooster. Roosters will have very bright colors consisting of purple, blue, green and red. Roosters will also have long brown and black striped tails. The female pheasant is called a hen and will be a dull brown color, meant for blending in with their surroundings. When pheasant hunting you will be targeting specifically the roosters because, on average, it takes one rooster per thirty hens to have a successful breeding population. (Default.aspx)

Pheasant Hunting Tips - Don McDowell
Rooster Pheasant (Huntingandfishing.com)

Step 1: Locate Huntable Pheasant habitat  

Pheasants can be found in 40 out of the 50 states in the United States. There are certain characteristics of a piece of land you will be looking for when hunting pheasant. “Pheasant habitat would include a combination of grasslands, idle fields, wetlands, croplands, haylands, and shrublands” (Pheasants). Once you have found an area that will support pheasants, you will need permission to hunt the land. This is where knowing fellow pheasant hunters and landowners comes in handy. However, if you don’t know anyone with land you can hunt, there is plenty of public land to hunt. The best way to find public land is to search the internet. Usually your states wildlife agency will have a page where you can view public land in that state.

Pheasant Hunting habitat, Wild Pheasant habitat, ND Pheasant, www ...
Pheasant Habitat (Kellyslimit.com)

Step 2: Gear Up

Need to have

Shotgun- .401, 20 gauge, 12 gauge

License- purchased online or in most sporting good stores

Proper clothing- dress for the weather

Blaze orange- helps you be seen by other hunters, check regulations, the more blaze the better

The correct type of ammunition- steel or lead shot, check regulations

Proper footwear- comfortable and waterproof

Nice to have

Bird Dog- help with flushing the birds and retrieving them

Pheasant hunting vest- allows you to carry things like extra shells, water for the dogs, and your birds

Locator collar- help you better control your dog

(The Real Outdoor experience)

Step 3 : Practice Your Shot

Before you head out to the field you will need to practice shooting your shotgun. Shooting a flying bird is easier said than done. There are a variety of ways to do this. One of the most popular is to practice using sporting clays. This will give you plenty of practice shooting your shotgun and provide valuable information like knowing how to lead a bird. To shoot sporting clays you can either go to a gun range with sporting clays or do it in your backyard. The only two pieces of equipment you will need for this, besides your gun and ammunition, are the sporting clays themselves and something to throw them in the air. These can be purchased at your local sporting goods store.

South Christian - Team Home South Christian Sailors Sports
Sporting clay thrower (Southchristainsports.com)

Step 4: Know the Rules and Regulations

Before you step into the field in search of a pheasant you will have to know the regulations. These regulations can vary from state to state and area to area. Regulations consist of such things as hunting seasons, how many birds you can shoot in a day, how much orange you need to wear, what kind of shot you can shoot and many other things. These rules and regulations can usually be found in a rules and regulations book available when you purchase you license or online on the state’s DNR website.

Shooting our limit

Step 5: Hunting Strategies

There are many different pheasant hunting strategies, depending on the amount of people you are with. If you are alone, you push the field. This is done by simply walking through the fields in hopes of getting close enough to a bird that it will start to flush up and fly. This is made a lot easier with a bird dog because they will use their nose to find birds and flush them up for you. If you are in a large group, a more group-oriented strategy will need to be put in place. You will want to have two different groups, the pushers and the posters. The pushers will start at one end of the area you are hunting and spread out in a line about 50 or so feet apart from each other. They will slowly walk together in this line towards the other end of the field where to posters will be sitting. The posters will also spread out in a line at the end of the field. The posters will keep the birds from running out the end of the field while the pushers will slowly walk, pushing the birds towards the posters. The pushers will usually get the first shots but, once you have confined the birds between the pushes and the posters, the birds will have nowhere left to go but to fly. This is where things start to get wild. However, when hunting in a group, you need to be extra careful of where you are shooting so you don’t shoot a fellow hunter or dog.

Me with a double kill

Step 6: Clean and cook you birds

The old saying “there are many ways to skin a cat” applies here. There are various methods of cleaning your bird, depending on what you want to do with the meat. The simplest way I have found to clean a pheasant is to simply remove the breast. However, this leaves a lot of usable meat left on the bird. Another way to clean your bird would be to pluck it and gut it. This will leave you with the most usable meat from you bird, however, it is very time consuming. Once you have your birds cleaned you will need to cook them. There are many ways to do this and my favorite way is to make pheasant poppers.

My pheasant poppers

My Experience Pheasant Hunting

Throughout my years of pheasant hunting I have hunted lots of pheasant ground in Minnesota and South Dakota. My favorite place to hunt is a small town outside of Pierre, South Dakota. With the amount of birds in this location you either have to have a really bad day or be a really bad shot not to come home with a bird. I personally shoot a 20-gauge shotgun because I feel it is moderately light for long walks but still has enough power to take down a bird. In South Dakota some of the regulations are things such as a three-bird a day limit and a 50% blaze orange rule. During the off season one of my favorite things to do is to practice my shot using sporting clays with my friends. Through the years I have fallen in love the sport of pheasant hunting. If you decide to give it a try, I believe you will too.

Me holding my newly won 20 gauge

Sources

“/Default.aspx.” Pheasantsforever.org, http://www.pheasantsforever.org/Habitat/Pheasant-Facts.aspx.

“PHEASANTS.” Landowner’s Guide: Pheasants, http://www.michigandnr.com/publications/pdfs/huntingwildlifehabitat/Landowners_Guide/Species_Mgmt/Pheasants.htm.

“The Real Outdoor Experience Gear Lists.” Troe, http://www.therealoutdoorexperience.com/gear-lists.

How to make French Silk Pie

Baking is a quick and easy way to pass time, and in moments like today where we are forced to stay home it is good to come up with some ideas to past time. Baking and making food is a very easy way to pass time and the end result is delicious. My mom and aunt got this recipe from my grandma and they both make it for thanksgiving and Christmas and now during quarantine I decided to make this with my mom. This type of pie that we make has an Oreo crust that is unbelievable.

So to start some materials you will need to complete this are the following….

For the crust you need, 20 Oreo Cookies (Regular stuffed and keep filling intact) as well as 3 Tablespoons of unsalted butter, melted

For the filling you will need 1 1/3 Cups of granulated sugar, 4 large eggs, 8 ounces of bittersweet baking chocolate which will be melted, 2 teaspoons of vanilla extract, 10 tablespoons of unsalted butter, 1 1/3 cups of heavy cream and 4 teaspoons of powdered sugar

And for the topping you will need 1 cup of heavy cream, 2 tablespoons of powdered sugar, 1 teaspoon of vanilla extract and chocolate chips to sprinkle on top.

Now onto the directions

Making the crust: Preheat your oven to 350 and spray a 9-inch pie dish with cooking spray. Place the Oreo’s in a bowl of a food processor and pulse until they are finely broken up. Add in the melted butter and pulse until moist. Then press the mixture into the pie dish and bake for 10 minutes. Let this cool completely.

Making the filling: In a small saucepan, whisk together the granulated sugar and eggs. Set over medium heat and cook, while whisking constantly until the mixture reaches 160 degrees and sticks to the back of a metal spoon. Then remove from heat and stir in the melted chocolate and vanilla until smooth. Then let cool until it is warm while stirring occasionally. Then using an electric mixer beat the butter until light and fluffy about 2 minutes. Gradually add in the cooled chocolate mixture then beat on high speed for 5 minutes until it is light and fluffy. Then in a separate bowl use an electric mixer to beat the cream until it begins to thicken. Add the powdered sugar and beat until it is stiff. Then fold into the chocolate mixture. Pour the mixture into the pan on the crust and let cool for 6 hours.

Making the topping: Use an electric mixer to beat the cream, powdered sugar and vanilla on high speed until it stiffens. Top pie with whipped cream and chocolate chips to add the final touch and make it perfect.

Lazy Lasagna

Written by: Annalise Parks

Photo taken by Annalise Parks

If college kids knew how to make real meals that weren’t so difficult and time consuming, maybe their dinner menus would change from pizza and popcorn to lasagna and meatballs.

What if I could tell you that there are shortcuts to eating delicious food, while remaining on a budget. There are many recipes out on the internet that can shorten meal preparation time and still make a delicious meal to enjoy.

This lazy lasagna recipe is super easy and tastes delicious. It is also very easy to customize to your own liking. You can make the meal totally vegetarian, using cheese raviolis, or if you’d like, you could substitute the cheese raviolis for chicken or beef raviolis. In the short video below you can watch as I attempted this lazy lasagna, demonstrating how easy the recipe really is.

Video created by Annalise Parks

Ingredients:

  • 1 (24 oz) bag of frozen cheese ravioli
    • Optional: chicken or beef stuffed ravioli
  • 1 (24 oz) jar of marinara sauce
  • 2 cups of shredded mozzarella (or more)
  • ½ cup shredded parmesan

Eating a good wholesome meal does not need hours of preparation. It only has to take a few minutes, with the right ingredients, to make a tasty meal. There are so many other recipes out there that can be found, either by looking through Pinterest or just surfing the web.

Works Cited

Lilly. (2020, March 10). Lazy Lasagna (Just 3 Ingredients!). Retrieved April 3, 2020, from https://www.thelazydish.com/lazy-lasagna-just-3-ingredients/

How To Keep Hunting Ethical

The question whether or not hunting is ethical is asked very often. There’s a large group of people against hunting, and a large group for hunting. So, how do we keep hunting ethical? I myself am a hunter and believe that hunting can be both right and wrong. There are different ways you can hunt that makes it more or less ethical. You might think because I am a hunter this will be a biased article, but its only fair that I stay as unbiased as I can to answer the question. Hunting can be wrong for many reasons. Many argue its unsafe and unnecessary. They say trophy hunters are terrible because they kill for the simple pleasure. While on the other hand people argue hunting provides food for their family or hunting supports animals’ conservation. I hope to shed light on both stand points.

Ethical hunting, In regards to how ethical it is to the animal you’re shooting, comes down to how you hunt. I was taught never to take a shot I was unsure in, whether using a bow or gun when I shoot, I make sure my shot is going to quickly kill my target. I practice shooting at home before every hunting season to make sure my shot is straight, and my equipment is ready.  Unfortunately, not every hunter practices these methods and not every shot is perfect. So many can argue its unethical, but majority of hunters practice ethical ways to harvest their target.

How dangerous is hunting? Before any hunter can buy a license or step foot in the woods, he/she has to pass a hunter’s safety course. If every hunter followed the rules taught in hunter’s safety then hunting wouldn’t be dangerous, but this isn’t a perfect world. Not everyone checks to see what’s behind that big buck, and you could end up killing or wounding something else. According to the international hunter education association, for the average year, fewer than 1000 people in the united states and Canada are accidentally shot by hunters. Of these fewer than 75 result in fatalities. (thoughtco.com) We do still have to keep in mind that this is only pertaining to hunters who were accidently shot. Most hunting injuries and fatalities are inflicted by the hunter themselves, but with every sport comes injuries and sometimes death.

Deciding if hunting is necessary can be controversial. You are perfectly capable of surviving in this day of age without hunting. Food is at your convenience, but for a price. personally, any animal I harvest is appreciated by being cleaned and packaged to fill the freezer. Hunting saves me the money that some people spend to buy steaks, burgers, exc. I was raised around hunting, my father guided elk and bear for most of my childhood. In the picture below you can see me at a very young age standing next to a bear bait pile. I have been all sorts of places hunting all sorts of animals, I have seen hunters and poachers do awful things. For instance, one time in Wyoming while I was elk hunting, I came across a hunter and a bull elk he had just harvested. I had asked him if he needed help packing the elk off the mountain, he assured me he would get it down himself. Unfortunately, the next day I came across the same elk, the skull and hide was all that hunter packed off the mountain. The saddest part is this is a common thing for some hunters to do. There is a community of unethical hunters that get away with some terrible things. Hunting for pleasure is unnecessary in many ways.

Trophy hunting is often considered to be for pleasure. I have been to Africa hunting and experienced firsthand what trophy hunting is. Behind trophy hunting is organizations like Safari Club International (SCI). This is where my hunt was purchased for Africa. All the profits go to the conservation of safari animals. SCI has chapters all throughout the united states. My family is apart of many organizations for hunting. Some include: Rocky Mountain Elk Foundation (RMEF), National Wild Turkey Federation (NWTF), and whitetails unlimited. All these organizations support conservation of animals. Although I couldn’t bring the meat back from Africa, I was told the meat was either sold or given to villages in need.

Hunting has provided me with many of memories I will always cherish. It brings my family together every year. The way I hunt and the way many hunters alike hunt is ethical. The way poachers and some trophy hunters hunt is unethical. Leaving meat to rot is unethical, a 70-yard shot with a compound bow through sticks is unethical. Just like most things when the rules are followed its ethical, but when they are broken it’s not. Hunting can be dangerous and unnecessary when rules aren’t followed and unfortunately not much more can be done then what already is being done to prevent this problem.

Design a site like this with WordPress.com
Get started